With the Athletic Scheduler (AS) integrated to Trip Request (TR), scheduling of transportation service for the AS events, both School Only and Conference/Non-Conference, is considerably easier now.
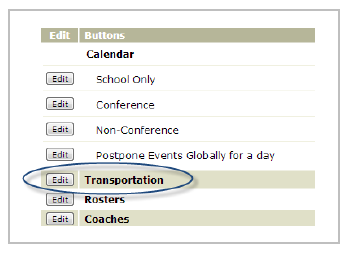
In the Main Menu of the Athletic Scheduler, click on the ‘Edit’ button for Transportation module to launch the Transportation Add/Edit page.
There are 2 Activity Types present in the Transportation module: 1) School Only and 2) Conference/Non-Conference. However, the AS-TR processes for both types are the same.
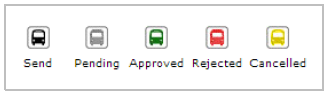
The ’Transportation Request Key’ provides you the status of the request. This is presented in colored keys to let you identify easily the status of each request.
a. Send (black bus) – it means that the request is still for sending. Before you would be able to send a request, you need first to populate its required fields: ‘Leaves’, ‘Returns’, and ‘Passengers’. The ‘Dismissal’ field is optional.
b. Pending (gray bus) – it means that the request has been sent to and received in the Transportation Request program but still being processed.
c. Approved (green bus) – it means that the request is approved in the TR program. It is already assigned with Bus(es) and Driver(s) from a certain Bus Company.
d. Rejected (red bus) – it means that the request in TR program is rejected. This status shows when a request is cancelled either in Dispatch Log or in Driver Assignment in TR.
e. Cancelled (yellow bus) – it means that the request is cancelled in the AS program. The transportation request needs to be in Approved or Pending status for it to be cancelled on AS side.
Sending Transportation Request
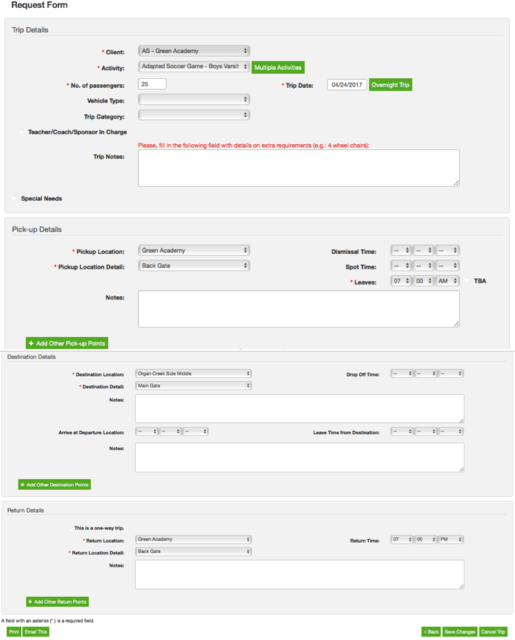
To view the activities, set first the information for the filters, and then click on the ‘View’ button. Once the activities are loaded, you need to populate the following required fields to allow you to send the Transportation Request:
You can also enter a ‘Dismissal’ time, but it is optional. Moreover, you can add notes to it by clicking the ‘Add/Edit Notes’ link and make the information hidden from the public (select ‘Don’t show to Public’).
Once you entered the information for the required fields, click on the ‘Send’ bus icon (black bus icon). You are going to see a confirmation saying ‘Transportation request successfully sent’. Then, just click ‘OK’.
The status of the request will become ‘Pending’ or will use the gray bus icon. On mouseover, you are going to see the date it was submitted and by whom.
Viewing Detailed Trip Request Information
When you click on the status bus icons except for the 'Send' status, you are going to view the detailed Trip Request Information.
Let us take for example the 'Pending' status icon, when you click on it, you are going to see its detailed Trip Request Information. The same information is shown in the “Trip Requests” tab of the Transportation Request program, except for the buttons at the bottom.
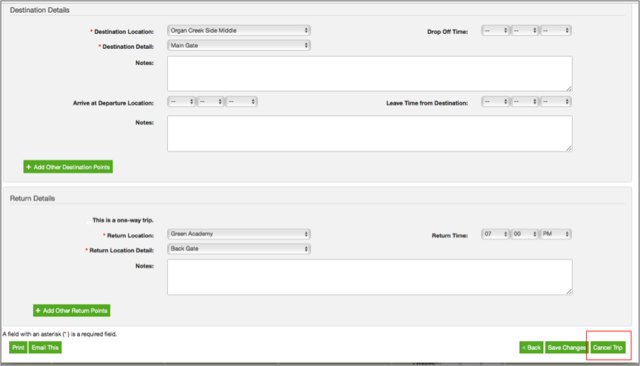
You can use respective buttons to Print and Email the Trip Request Information. Also on this page, you can cancel the trip by clicking on the ‘Cancel Trip’ link.
Resending Transportation Request
If you change any information (leave time, dismissal time, return time, checking off or unchecking ‘Don’t show to Public’, and/or adding/editing notes) of a Transportation Request with ‘Pending’, ‘Approved’, or ‘Rejected’ status, automatically its status will become ‘Send’. A prompt will appear informing you that you need to click on the ‘Send’ bus icon to resend the request.
Note:
Fields with edited information will be shown in Green text both in Dispatch Log and Driver Assignment tabs of Transportation Request program.
The TR Master Admin will be notified with the updated information. Also, the AS Trip Requester will receive a confirmation email from TR program that the request has been resent with changes and is currently in Dispatch Log.
PLEASE NOTE OF THE FOLLOWING:
Editing and/or Rescheduling of AS C/NC Event
If a Transportation Request has been sent already and a User rescheduled or changed any of the following information: Date, Start Time, End Time, Home/Host, Opponent, and Location of an AS Conference/Non-Conference event, the existing Transportation Request will be CANCELLED and a NEW ONE will be sent. A prompt will appear asking if the user would want to be redirected to the Transportation Module to fill in the required fields and send the request already. Options will be: ‘Yes, I want to send the Transportation Request now’ and ‘No, I will send it later’.
Cancelling or Deleting of AS C/NC Event
Once an AS Conference/Non-Conference Event, with Transportation Request already sent, has been cancelled or deleted, automatically its Transportation Request will be cancelled as well.
Note: AS Event Creator (Trip Requester), Athletic Director, and TR Master Admin (the one set up in General Settings) will receive notification on the cancelled Transportation Request.
Editing Type, Level or Gender of AS C/NC Event
If Type, Level and/or Gender of an AS Conference/Non-Conference Event has/have been updated, automatically Transportation Request will be updated accordingly as well.
Cancelling Transportation Request
You or any AS School Administrator who has access to Transportation section can cancel a Transportation or Trip Request from AS side, if you don’t want to proceed with the trip request. You can only cancel request with ‘Pending’ or ‘Approved’ status.
1. Click on the status bus icon to view the transportation request status and detailed info.
2. Once on the Trip Request Information page, click on the ‘Cancel Trip’ at the bottom.
3. A prompt will appear asking you ‘Do you want to cancel this trip?’.
4. Click ‘OK’ (or click ‘Cancel’ if you don’t want to proceed).
Once a Transportation Request is cancelled, its status will become ‘Cancelled’ showing the yellow bus icon.
Approving Transportation Request in TR
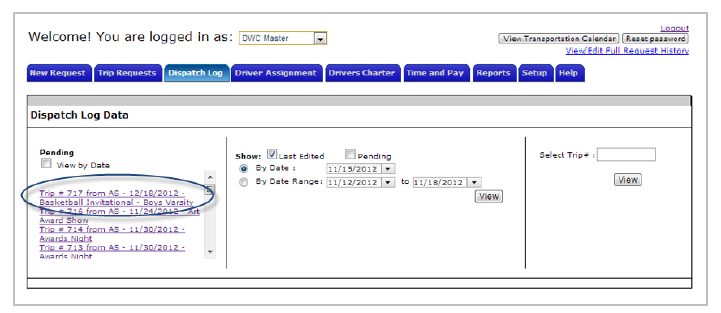
Once the Transportation or Trip Request is sent from AS, and is on ‘Pending’ status, it goes automatically to Dispatch Log in TR.
Note: In AS-TR integration, Athletic Scheduler is the Client Name created for AS in TR. All requests from AS will be under Athletic Scheduler client name in TR. The Requester’s Name will be taken from the log in information of the one who submitted the request.
Go directly to the Dispatch Log in TR.
You are going to notice that in the Trip information, the words ‘from AS’ are included. This is to easily identify trip requests coming from AS.
Also, for Conference/Non-Conference Activity, the Trip information is shown in Trip # from AS-Date of Event-Activity-Event-Gender-Level format. For School Only, the format is Trip # from AS-Date of Event-Activity.
When the approver or the TR Administrator selects the Trip #, a prompt will appear saying that the following information should be added:
- Trans Co.
- Arrive at Pick-Up Location
- Destination Dropoff Time
- Leave from Destination Time
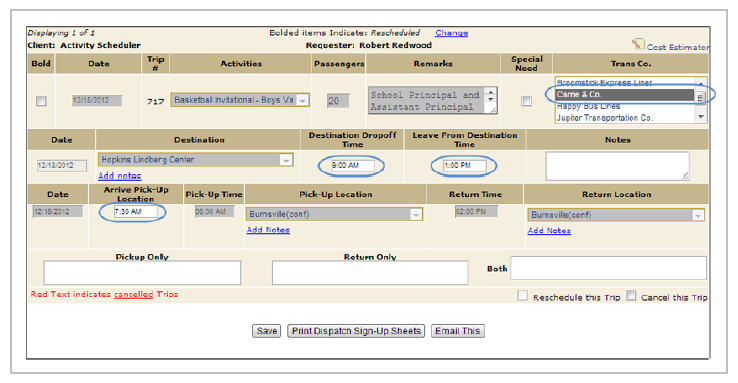
Once the TR Administrator clicked the ‘Save’ button, the system will check for the Requester.
Step 1 - If the Requester is not yet stored in TR, the system will ask if Requester will be added to the Requesters Database.
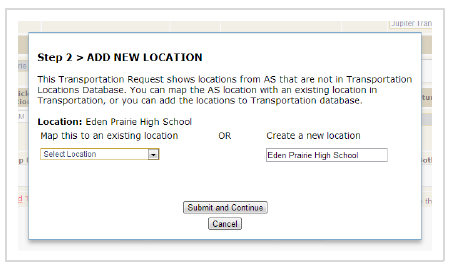
Step 2 - Also, if the Location from AS is not yet included in the Database in TR, the system will prompt to map it to an existing location or to create a new one.
Step 3 - Then, the system will ask to add Location Details. By default, you need to create a new location detail for newly added location. If a location already exists in the TR database, you will have the options to either select from an existing entry or create a new one. Also, complete the location details for Pick-up and Return Locations.
Once the information has been submitted, the TR Administrator can already proceed to assigning Bus(es) and Driver(s) to the trip in the Driver Assignment tab.
Please note that Transportation Request coming from AS will only appear in Driver Assignment after it has been completely processed in Dispatch Log.

After populating the required fields and once the ‘Save’ button is hit, a prompt will ask if the Submitter or Requester will be notified. After that, the Transportation Request will be approved.
Rejecting (Cancelling) Transportation Request in TR
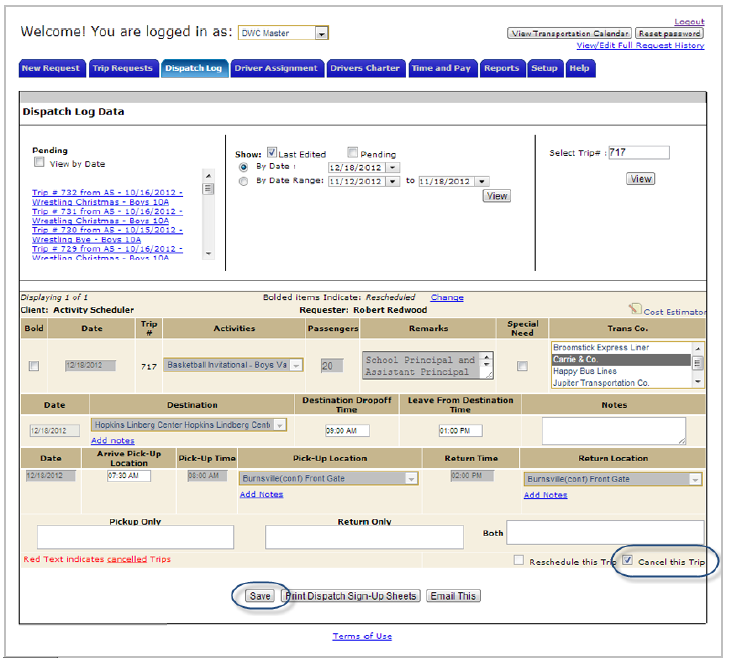
On TR side, Transportation Request can be cancelled either in Dispatch Log or in Driver Assignment tab. Simply check off the ‘Cancel this Trip’ box at the bottom right of the page, then click on the ‘Save’ button.
Once the ‘Save’ button is clicked, a prompt will appear ensuring the request to cancel the trip. Click ‘OK’. Trip Requester, Transportation Company, and Assigned Driver(S) will receive notification email.
Note: The fields of a cancelled Transportation Request are shown in Red Text.
Transportation Request in AS will have ‘Rejected’ status already. It will show the red bus icon.

.jpg)


 Back
Back